5d Mark Iii Shutter Won t Close Unless I Click Again
Solution
With your camera, you can shoot while viewing the image on the camera'southward LCD monitor. This is chosen "Live View shooting".
This page describes how to change the focus mode for Alive View shooting. For details on how to perform easy Live View shooting in default settings, please refer to the 'Related information' section at the terminate of the page.
Delight note that some shooting procedures differ betwixt still photos and movies. To shoot yet photos, please refer to the instructions for still photos, and to shoot movies, please refer to the instructions for movies.
REFERENCE
If yous handhold the camera and shoot while viewing the LCD monitor, camera shake may crusade blurred images. Using a tripod is recommended in such cases.
Part I. Preparing For Alive View Shooting
1. Turn on the camera.
- Plow the photographic camera's power switch to <ON>.
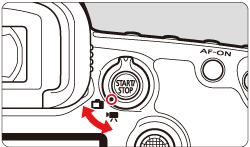
two. Set the Live View shooting/Movie shooting switch to <  > to shoot still photos, and to <
  > to shoot movies (when < > is selected, the image volition exist displayed on the LCD monitor).
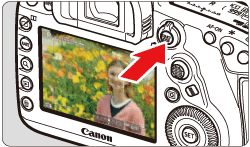
3. Display the Live View paradigm.
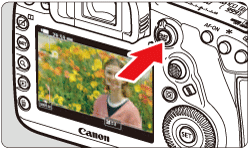
- For nonetheless photos, press the <
 > push button. The Alive View image will announced on the LCD monitor.
The Live View image will exist displayed in the brightness level closely matching that of the actual prototype to be captured.
Annotation
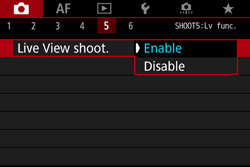
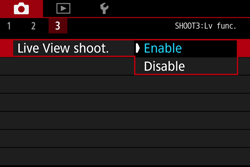
To shoot still photos, select the [  ] tab and and then select [Enable] in the [Live View shoot.] choice. ([Enable] is set by default.)
(or the [  ] tab in the <
  > fashion)
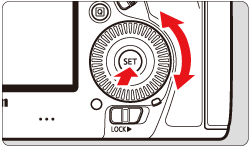
4. Select the shooting mode.
- Plow the Mode Punch to select the shooting mode.
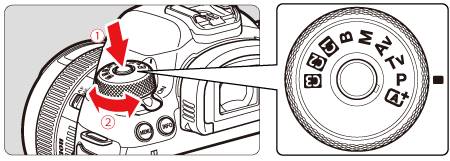
 Press the lock release button.
 Turn the Manner Dial.
For focusing with AF (Autofocus), go to Function II. Selecting the AF (Autofocusing) Method; for MF (focusing manually), get to Part Iii. MF Method: Focusing Manually. The procedures in Role II and Part III are the aforementioned for however photos and videos.
Part II. Selecting the AF (Autofocusing) Method
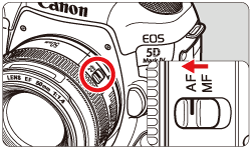
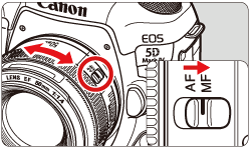
five. Set the lens's focus fashion switch to <AF>.
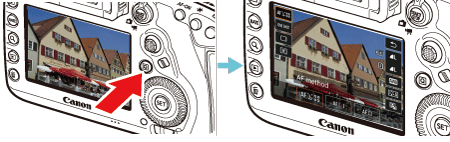
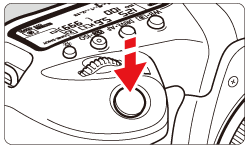
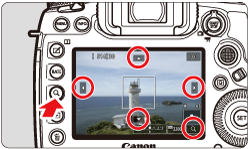
6. Printing the <Card> button.
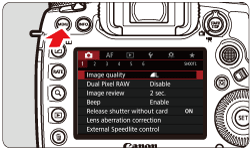
7. Each time you press the <  > button, the chief tab (group of functions) will switch.
Turn the <  > dial to select a tab.
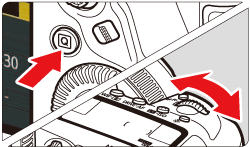
8. Turn the <  > punch to select AF Method, then press the <
  > button.
9. Turn the < > dial to select an AF mode, and and then printing < >.
10. Press the <MENU> push and shut the carte window. An image will appear on the LCD monitor.
NOTE
While the image is displayed on the LCD monitor, pressing the <  > push volition enable you to set the AF method etc. on the Quick Control Screen.
For more information, please refer to the teaching manuals included with your camera.
The next step may differ depending on the AF Method setting, and then delight confirm your AF mode setting earlier proceeding.
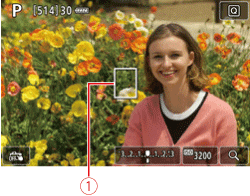
Office Ii-1. AF Method: (face)+tracking
Office 2-2. AF Method: FlexiZone-Multi
Office Ii-3. AF Method: FlexiZone-Unmarried
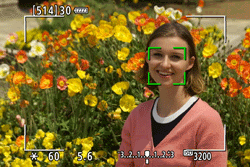
Part Two-1. AF Method: (face)+tracking
The photographic camera detects and focuses on homo faces. If a face moves, the AF point <  > as well moves to track the face.
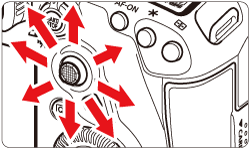
eleven. Select an AF point.
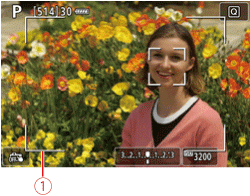
 Surface area frame
12. Focus on the subject.
- Press the shutter button halfway to focus.
If no faces tin can be detected or if you do not tap annihilation on the screen, the photographic camera volition switch to FlexiZone-Multi.
When focus is accomplished, the AF indicate will plough green and the beeper will sound.
If focus is not achieved, the AF point will turn orangish.
NOTE
Focusing on a subject area other than a homo face up
REFERENCE
- If the subject's face is significantly out of focus, face detection volition not be possible. Adjust the focus manually so that the confront can be detected, then perform AF.
- An object other than a human confront may be detected as a face.
- Face detection will not work if the face is very pocket-sized or large in the moving-picture show, too bright or too dark, or partially hidden.
- The [ ] may cover only part of the face.
- AF is not possible with a face up or bailiwick forth the periphery. Aim the area frame over the subject and focus.
- Size of the AF indicate changes depending on the subject field.
Part Two-two. AF Method: FlexiZone-Multi
You tin use upwardly to 63 AF points for wide-surface area focusing (automatic option). This wide area can also be divided into 9 zones for focusing (zone selection).
xi. Select the AF point.
Expanse frame
Zone frame
12. Focus on the subject.
Aim the AF signal over the subject and press the shutter button halfway.
- When focus is accomplished, the AF point volition plough light-green and the beeper will sound.
- If focus is not achieved, the AF point volition plough orange.
Part 2-iii. AF Method: FlexiZone-Single
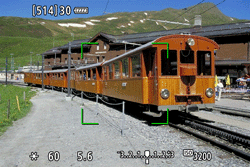
[AF Method: FlexiZone-Single] The camera focuses with a single AF indicate. This is effective when you lot desire to focus on a detail subject.
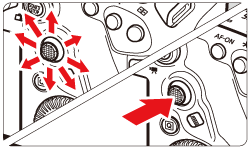
eleven. Move the AF point.
The AF point [  ] appears.
AF point
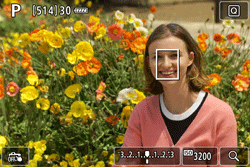
12. Focus on the subject.
- Aim the AF point over the subject and printing the shutter push halfway.
When focus is achieved, the AF point will turn green and the beeper will sound.
If focus is not achieved, the AF point will turn orangish.

Part Iii. MF Method: Focusing Manually
You tin magnify the image and focus precisely with MF (transmission focus).
v. Set up the lens'southward focus mode switch to <MF>.
In one case you lot have completed steps 1-4 of Part I, set the lens's focus fashion switch to <MF>.
Turn the lens focusing band to focus roughly.
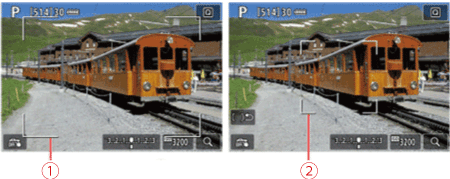
6. Display the magnifying frame.
Press the <  > push button or tap on [
  ] on the lower right of the screen.
The magnifying frame volition announced.
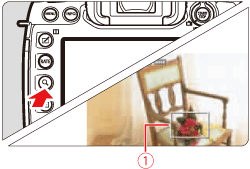
Magnifying frame
7. Move the magnifying frame.
Either operate <  > or tap on the spot you want to magnify to move the magnifying frame to where you want to focus.
Pressing < > or < > will return the magnifying frame to the screen eye.
8. Magnify the image.
Each fourth dimension you lot press the < > button or tap on [ ] on the lower right of the screen, the display will modify in the following sequence:
Normal view -> 1x -> 5x -> 10x -> Normal view
While in magnified view, you can operate < > or tap on the triangle displayed on the pinnacle, lesser, left, or right of the screen to coil effectually the magnified epitome.
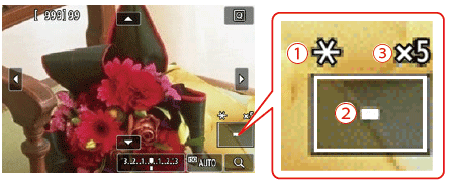
AE lock
 Magnified area position
 Magnification (Approx.)
9. Focus manually.
While looking at the magnified image, plow the lens focusing ring to focus.
Subsequently achieving focus, press the < > push to return to the normal view.
NOTE
In the [FlexiZone - Multi] and [FlexiZone - Single] modes, either printing the < > button or tap on [ ] displayed on the bottom correct of the screen. Yous tin can magnify the epitome by approx. 5x or 10x and check the focus.
Magnified view is non possible with [  +Tracking].
- To move the AF indicate or select a zone, operate < > or tap on the spot you want to magnify.
- Either press the < > button, or tap on [ ] to magnify the image. Each time you press the < > button or tap on [ ], the magnification ratio changes.
- When [FlexiZone - Multi] is ready, the image will be magnified at the eye of the zone frame (or paradigm heart with automated selection). When [FlexiZone - Single] is set, the image volition be magnified at the AF point.
- At 100% (approx. 1x) magnification, operate < > or tap on the screen to move the magnifying frame. Pressing < > or < > volition render the magnifying frame to the screen center.
- Either press the < > push or tap on [ ] to magnify the area covered by the magnifying frame.
- When the image is magnified past approx. 5x or 10x, yous can change the magnified area past operating < > or tapping on the triangle on the screen top, bottom, left, or right.
- When you press the shutter button halfway, the normal view will render for [FlexiZone - Multi]. For [FlexiZone - Single], AF will go on with the magnified view.
- With Servo AF and magnified view, pressing the shutter button halfway will render to the normal view for focusing.
Function Four. Shooting
After focus is achieved by post-obit the instructions in Parts II - III, outset shooting.
1. Shooting even so photos.
- To shoot withal photos, press the shutter push completely.
The motion-picture show will exist taken and the captured image displayed on the LCD monitor.

Later on the prototype review ends, the photographic camera will return to Live View shooting automatically.
Pressing the < > volition end the Live View shooting.
NOTE
- Even when focus is achieved, pressing the shutter push button halfway will focus again.
- The image brightness may change during and after the AF operation.
- Depending on the subject and shooting atmospheric condition, it may take longer to focus or the continuous shooting speed may subtract.
- If the light source changes while the Alive View prototype is displayed, the screen may flicker and focusing may be difficult. If this happens, exit Live View shooting and perform AF under the bodily light source under which you lot are shooting.
2. Shooting movies.
- Press the < > button.
While the movie is being shot, the " " mark will be displayed on the upper correct of the screen.
Sound will be recorded by the built-in microphone.

Recording movies
Congenital-in microphone
To stop shooting the movie, printing the < > push button once again.
Full general Live View Shooting Cautions
Delight be aware of the following when performing Live View shooting.
CAUTION
- When you shoot at high ISO speeds, noise (such every bit dots of light and banding) may get noticeable.
- Shooting in loftier temperatures may cause dissonance and irregular colors in the image.
- If Live View shooting is used continuously for a prolonged menstruation, the camera's internal temperature may rise, and image quality may deteriorate. Ever go out Live View shooting when you are not shooting.
- If you shoot a long exposure while the camera'southward internal temperature is high, image quality may deteriorate. Exit Live View shooting and wait a few minutes before shooting once more.
White [  ] and Red [
  ] Internal Temperature Warning Icons
- In magnified view, the shutter speed and aperture will be displayed in red. If you have the picture in magnified view, the exposure may not come up out as desired. Render to the normal view before taking the motion picture.
- Even if y'all take the picture in magnified view, the image will be captured with the image surface area of the normal view.
- Under low- or vivid-lite weather condition, the Live View epitome may not reflect the brightness of the captured paradigm.
- Even if a low ISO speed is set, noise may be noticeable in the displayed Live View image under depression light. Nonetheless, when you shoot, the image recorded will have less noise. (The epitome quality of the Live View image is dissimilar from that of the recorded image.)
- If the light source (illumination) within the image changes, the screen may flicker. If this happens, go out Alive View shooting and resume Alive View shooting nether the actual light source.
- If y'all point the camera in a different direction, it may throw off the Live View image'south correct brightness momentarily. Wait until the effulgence level stabilizes before shooting.
- If there is a very vivid light source in the image, the bright area may appear blackness on the LCD monitor. However, the bodily captured image will correctly show the bright expanse.
- In low calorie-free, if you set up the [
 : LCD brightness] to a brilliant setting, racket or irregular colors may announced in the Live View prototype. Even so, the noise or irregular colors will non be recorded in the captured image.
 - When you magnify the image, the image sharpness may look more pronounced than in the actual image.
- During Live View shooting, sure Custom Functions will not piece of work (certain settings get invalid). For details, refer to the camera transmission instructions.
- If the attached lens has an Image Stabilizer and you set the Image Stabilizer (IS) switch to <ON>, the Image Stabilizer will operate at all times even if y'all do not press the shutter button halfway. The Image Stabilizer consumes battery ability and may decrease the number of possible shots. When the Prototype Stabilizer is not necessary, such equally when using a tripod, it is recommended that you prepare the IS switch to <OFF>.
- The focus preset function is possible for Live View shooting only when using a (super) telephoto lens equipped with the focus preset mode released in and later the 2d half of 2011.
- Atomic number 26 lock will not piece of work if the built-in flash/external Speedlite is used. Modeling flash will non piece of work if an external Speedlite is used.
houghtontheatchere44.blogspot.com
Source: https://th.canon/en/support/8202994100
Post a Comment for "5d Mark Iii Shutter Won t Close Unless I Click Again"